In the Control Centre, you can view alerts that have occurred on-site, record actions taken to resolve alerts, and clear alerts once the issue has been resolved.
Alerts can be managed individually or in bulk, allowing multiple alerts to be updated at the same time.
User Permissions
-
Safety Managers can manage all alerts triggered at their location.
-
Administrators can only manage service alerts triggered at their location.
-
Supervisors can only manage alerts triggered by their team.
-
Log in to the Control Centre.
-
Go to Alert Handling.
-
Use the filters at the top of the page to narrow the results:
-
Location
-
Team
-
Date Range
-
-
Use the status tabs to view alerts by status:
-
New – Alerts that have not yet been acknowledged.
-
Acknowledged – Alerts that have been reviewed and had actions recorded, but the issue has not yet been resolved.
-
Resolved – Alerts that have been resolved and closed.
-
-
Use the alerts tabs to view alerts by type:
-
Sensor Alerts – Triggered if a sensor is out of range for too long
-
Check Alerts – Triggered if staff discover an issue when completing work on the Checkit App
-
Overdue Alerts – Triggered if a checklist on the Checkit App is not completed in time
-
Service Alerts – Ttriggered if a sensor, hub, or repeater cannot communicate with the cloud/a sensor or repeater has low battery
-
For Sensor Alerts and Service Alerts, you can further filter the results by selecting the following tabs:
-
All – Displays all alerts.
-
Currently Alerting – Displays alerts where the issue is still occurring.
-
Stopped Alerting – Displays alerts where the issue has stopped occurring but the alert has not yet been resolved.
-
To update:
-
An individual alert:
-
Click the alert to view details.
-
Enter a comment describing the action taken.
-
Click Acknowledge if the issue has been resolved, or Resolve if the issue has been resolved.
-
-
Multiple alerts:
-
Select the checkbox next to each alert you want to update, or select the checkbox in the column header to select all alerts displayed on the current page.
-
Click Acknowledge if the issue has been resolved, or Resolve if the issue has been resolved.
-
Enter a comment describing the action taken.
-
Click Acknowledge or Resolve to confirm the action.
-
-
You can acknowledge an alert as many times as you want.
Resolving an alert is irreversible. Only resolve an alert if you are certain that the issue has been resolved.
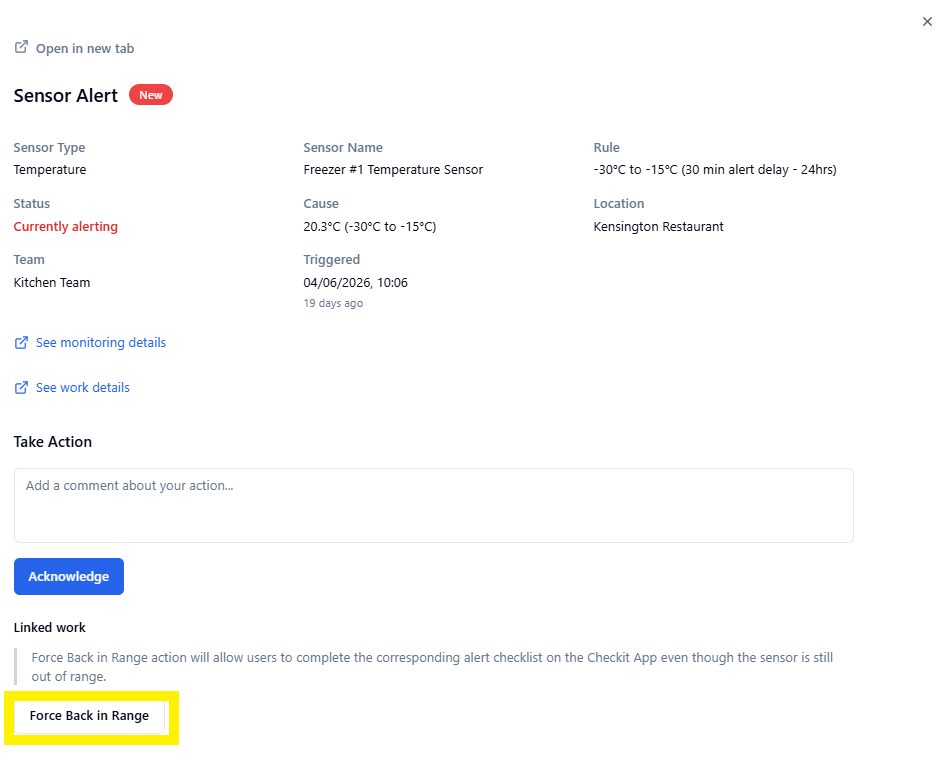
You cannot resolve a sensor or service alert if the device is currently alerting (e.g. if the temperature is still out of range or the device is still unable to communicate with the cloud).
Force Back in Range
You must be a Safety Manager to use the Force Back in Range button.
If you use our Mobile Alerting feature, you can configure a checklist so that sensor alerts cannot be cleared from the Checkit App if the sensor is still out of range (see image 1). This ensures that alerts are only cleared from the app once normal conditions have been restored.
However, in some cases, a sensor may not come back in range if, for example, a fridge or freezer is out of service. In these situations, you can use the Force Back in Range button (see image 2) to manually override this requirement, enabling staff to clear the alert from the app even if the sensor remains out of range.