You can add a Standard User or Customer Administrator if you want to grant an individual access to the CAM+ Website.
Follow the instructions below if your account does use Single Sign-On (SSO) (i.e. users log in to the CAM+ Website with their work password).
If your account does not use Single Sign-On (SSO) (i.e. users log in to the CAM+ Website with a separate Checkit password), see Add a User/Customer Administrator (Accounts without Single Sign-On).
You must be a Customer Administrator to add a user.
Step 1: Approve the User
-
Log in to the CAM+ Website.
-
Click Manage Users.
-
Click the view icon on your company name.
-
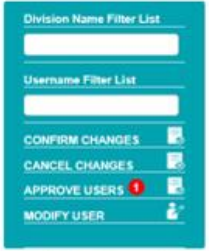
Click the approve users icon. You will see a list of available users to add to the CAM+ Website.
-
Click the approve icon.
If you cannot find the user in the list:
-
Click the Add User icon and continue with step 2 below.
-
Contact your IT manager and request that they:
-
Register the user with your identity provider, for example, Microsoft Azure, Okta, Auth0, etc.
-
Grant the user access to CAM+ services
-
Note: The user will not be able to log in to the CAM+ Website until your IT manager has done so.
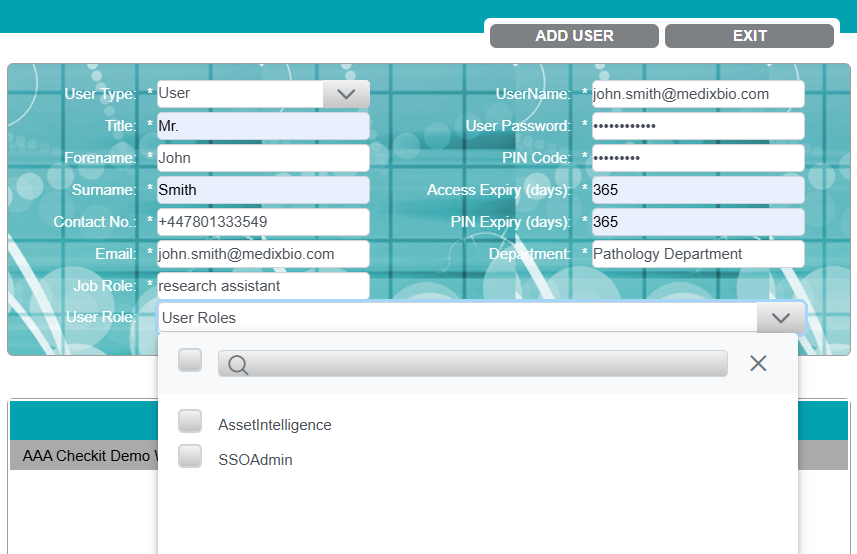
Step 2: Enter the User’s Details
-
Select a type of user from the dropdown menu:
-
Customer Admin (can manage other users)
-
User (cannot manage other users)
-
-
Complete all remaining applicable fields (see Table 1 at the bottom of this page for a description of each field).
-
(If applicable) Assign the user the following role(s) to provide access to optional features (see image 2):
-
Asset Intelligence: Can only be assigned to Customer Administrators - allows the user to view the Asset Intelligence Dashboard.
-
SSO Admin: Can be assigned to both Customer Administrators and Standard Users - allows the user to configure Single Sign-On.
-
Asset Intelligence and Single Sign-On are optional features. Please contact us to enable them.
-
Check the box on your company name.
-
Click Add User.
-
Enter the 3 digits requested from your PIN.
-
Click Submit.
Step 3: Grant the User Permissions
-
Find the user that you just created in the table on screen.
Use the page numbers/ arrows above the table to browse the list of users.
You can search for a user by typing their first name in the Username Filter List field on the left.
-
Click the permissions icon on the user.
-
To grant the user a permission, check the box for the relevant department(s). Alternatively, to grant the permission in all departments of all sites, check the box in the column header.
See User Permissions for a full description of all user permissions.
You can enable all permissions for all departments of all sites by clicking the Site/ Group box on the top left of the table.
-
Click Confirm Changes.
-
Enter the 3 digits requested from your PIN.
-
Click Submit.
Table 1: Description of User Details Fields
|
Field |
Details / Description |
Field |
Details / Description |
|
|
|---|---|---|---|---|---|
|
Title |
For example, Mr., Mrs., Dr, etc. |
Forename |
For example, John, Fatima, Anh, etc. |
Surname |
For example, Smith, Rashid, Nguyen, etc. |
|
Contact No. |
This can be a landline or cell phone number The user will not receive alarm/alert notifications by entering this number. See Create a Contact if you would like the user to receive alarm/alert notifications. |
|
This field will already be completed, for example, anh.nguyen@medixbio.com You cannot edit this field. The user will not receive alarm/alert notifications to this email address unless they are added as a contact. See Create a Contact if you would like the user to receive alarm/alert notifications. |
Job Role |
For example, lab technician, research assistant, etc. |
|
Username |
This field will already be completed, for example, anh.nguyen@medixbio.com You cannot edit this field. |
User Password |
This field will already be completed. The user will log in to the CAM+ Website with their work password. |
PIN Code |
Create a PIN code for the user. A PIN code is a 9 digit code the user must enter when completing certain tasks on the CAM+ Website such as updating an incident audit, editing isolations, etc. The PIN code must have 9 digits, contain only numbers and/or letter, and not contain special characters. Please make a note of the PIN you created for the user and give it to them. The user can reset their PIN later if they want. See Reset Your PIN for instructions. |
|
Account Expiry |
This field will be greyed out. You cannot configure when a user’s password will expire on the CAM+ Website. Your IT manager must configure this in your identity provider account. |
PIN Expiry |
Enter the number of days that you want the user's PIN to be valid (between 1 and 365). Only enter numbers. We recommend that the PIN and access expiry be the same. After this time, the user’s PIN will expire, and a Customer Administrator will need to reactivate it. See Reactivate a User’s PIN/Password for instructions. |
Department |
For example, Haematology Department, Pathology Department, etc. |