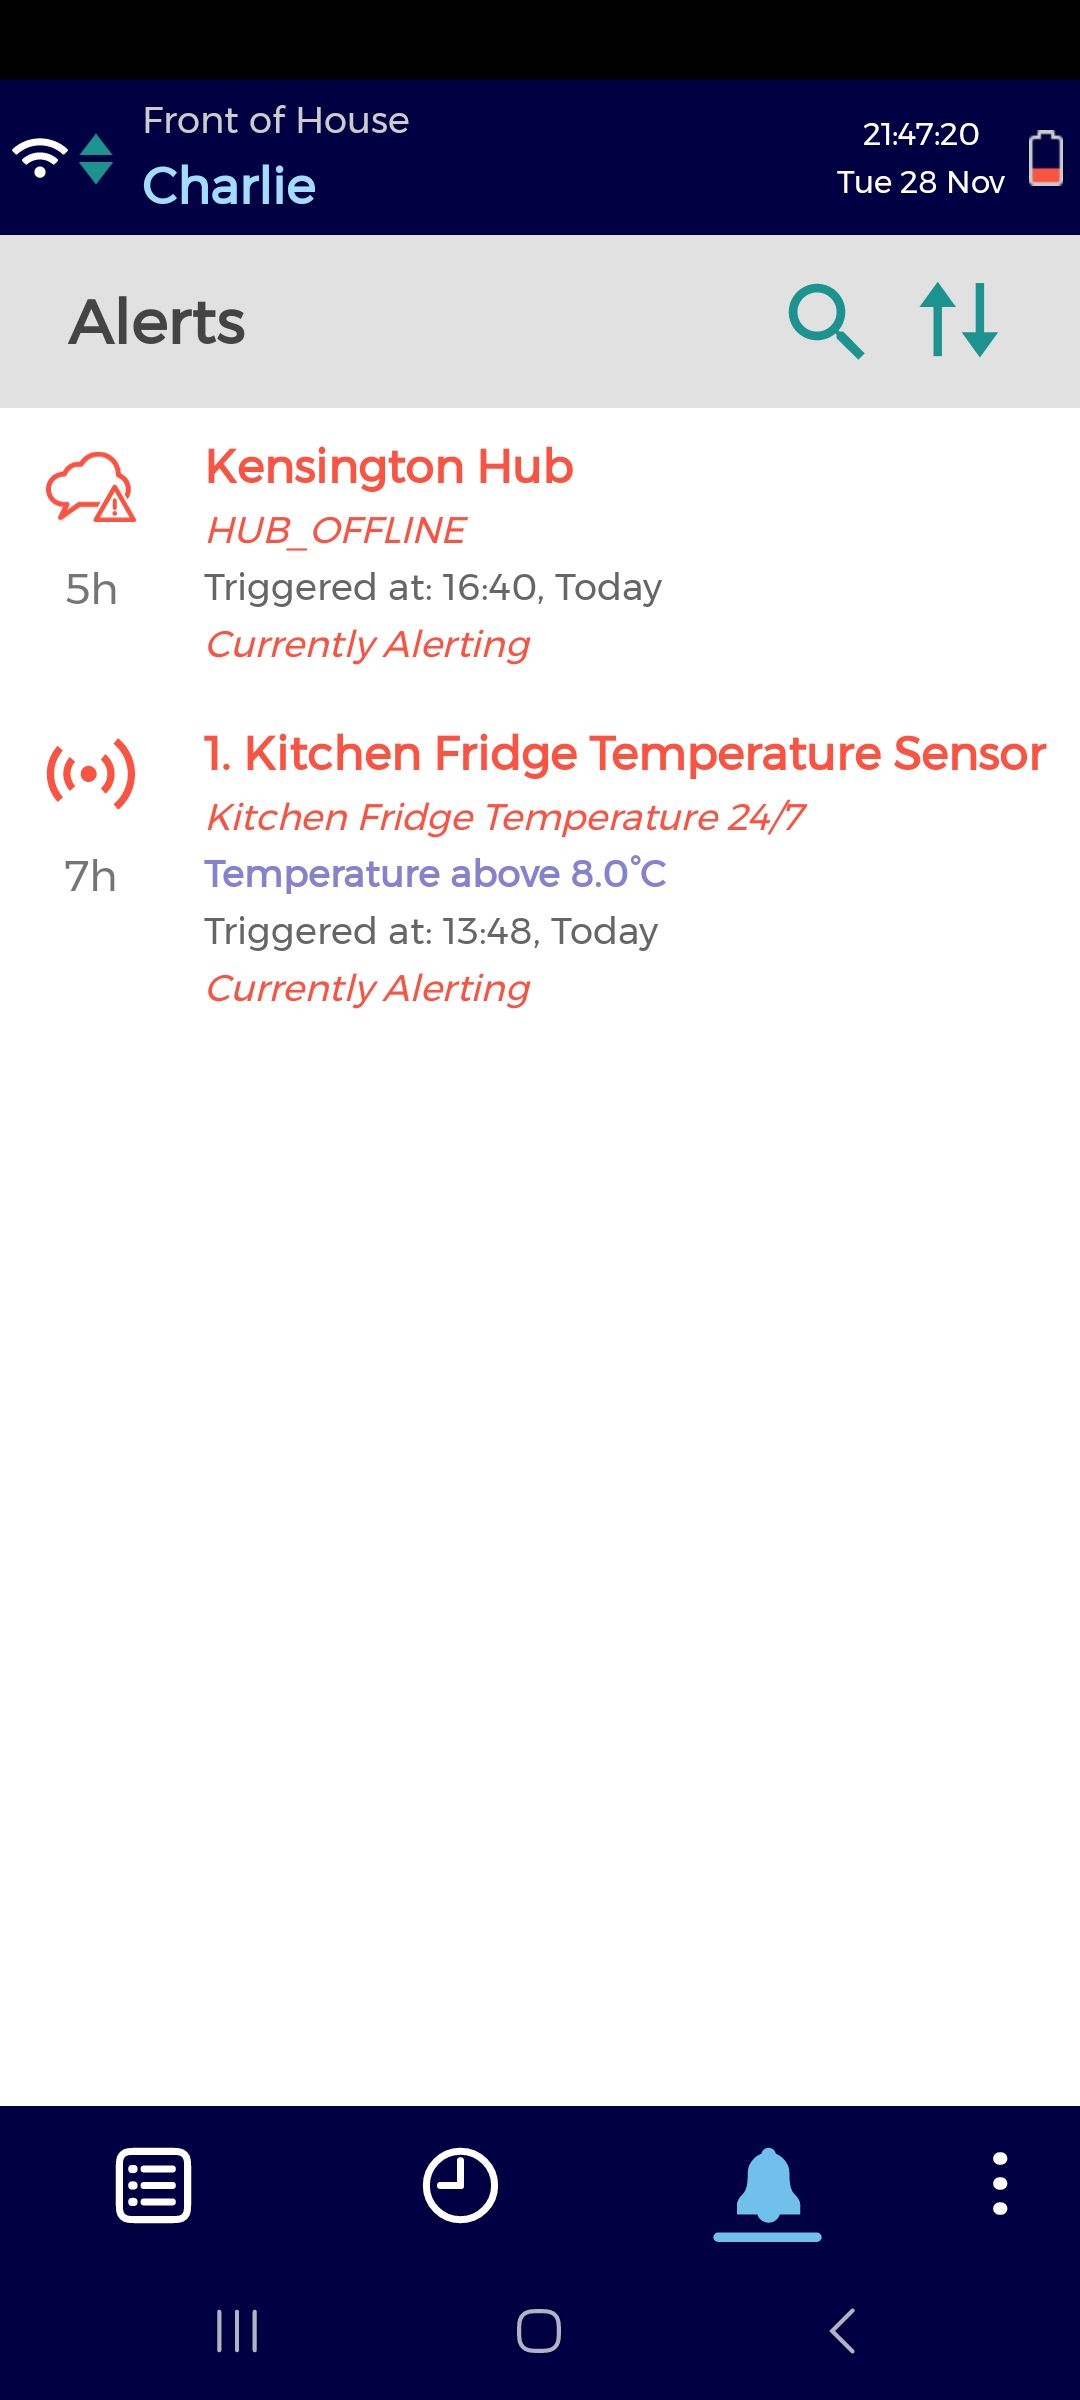
Skip table of contents

Mobile Alerting

Our Mobile Alerting feature (previously known as Event Driven Action) enables you to assign a checklist to alerts / alarms so that when staff receive an alert / alarm notification on the CWM App/Memo, they are also prompted to compete a checklist, which you design, to help them resolve the issue causing the alert/alarm.

Overview

Checkit alerts designated staff when an item being monitored by one of our sensors (fridge, freezer, hot-hold for example) is operating outside of parameters you’ve specified in a sensor rule, (sensor alerts) or when there a problem with a Checkit sensor or its network (service alerts). Customers using Automated Monitoring are notified through email and reports in the Control Centre. Customers using Automated Monitoring+ may be notified by email, SMS or phone call from Checkit Customer Services as well as the CAM+ website.

However , if you also use our Workflow Management (Checklist) service, alerts and alarms are also alerted on the mobile App / Memo so your staff get the details ‘in their pocket’ and don’t have to login to email or website to get them.

Additionally, with the Mobile Alerting feature, you can assign a checklist to alerts/alarms so that when staff receive notification on the App/Memo, they are also prompted to compete a checklist, which you design, to help them resolve the issue causing the alert/alarm. And, within the designated checklist, you can specify that completion of selected checks, or the whole checklist, automatically acknowledges or clears the alert/alarm and updates all reports accordingly, so that the whole team know what is happening. Using this approach you can be reasonably sure your facilities are managed in the most efficient manner and your operating standards maintained.

You can assign a Checklist to different types of alert/alarm (sensor, service, low battery, etc.). The checklist will accompany the alert/alarm notification and be presented to the staff that receive them. Alerts are sent to staff based on their defined role with Checkit (Safety Manager, Administrator, Supervisor or Operator) and their location. You receive alerts from any sensors/Checkit devices in the same location to which the App/Memo you are using is assigned (and any of its sub-locations) - only. You do not receive notifications for alerts/alarms related to other locations (including parents of the location your App/Memo is assigned to). The following sections describe how alerts/Alarms with Checklists work and how you set it up. For more information about alerts/alarms refer to Assign Who Receives Alerts.

CAM+ users can choose to use this feature in addition to receiving emails, SME or phone calls from our Customer Service team, or instead of that service.

How Alert/Alarm Checklists Present to Users

When your organisation is using our Mobile Alerting facility, sensor and service alerts/alarms are sent and present in the usual way to mobile App / Memo users, in the Alerts tab.
However, if the user taps on an alert in the list, a new page opens which includes additional details about the alert/alarm and, if you have assigned a checklist to the type of alert/alarm, a checklist of actions to be completed to resolve the issue. That checklist can be setup so that completion of a particular check, or the checklist itself, acknowledges and/or clears the alert automatically: reports and alert/alarm listings on the App/Memo are also updated automatically, so the whole team know what is happening.

As you can see above, the alert/alarm notification tells you which senor/device the alert/alarm relates to, when the issue occurred and, in the case of temperature related alerts/alarms, the temperature of the device when the alert/alarm was raised. In the example right, 'Durham Dales Deli' is the location and '1 Kitchen Freezer' is the name of the device being monitored by the senor that has raised the alert/alarm.

More details about the temperature of the device including graphs showing its movement over time are available in the Control Centre / the CAM+ website - refer to Reports

You receive alerts/alarms from any sensors/Checkit devices in the same location to which the App/Memo you are using is assigned (and any sub-locations) only. You do not receive alert notification related to other locations (including parents of the location your App/Memo is assigned to).

Alarms raised by sensors to which you have not assigned a checklist (as described under Assign a Checklist to an Alert/Alarm below) are not reported/notified on the CWM app/Memo.

With Workflow Management, there is a feature called Check Alerts which enables the generation of an alert from a selected check response: if a checklist user answers 'no' to a prompt, for example, you can set the system to raise an alert. These types of alerts are not yet connected with Mobile Alerting and so cannot be accompanied by a checklist: Mobile Alerting may support these types of alert in the future.

Build an Alert/Alarm Checklist

Checkit Workflow Management is used to build digital checklists and hence to support management of work tasks and automate the associated record keeping - ensuring staff do the right thing in the right order at the right time and a record is kept - fire drills for example, or detailed medical procedures. You build a checklist for use with an Automated Monitoring alert/alarm in exactly the same way as any other Checkit checklist, with the exception that certain additional options have been provided that relate specifically to use of a checklist with alerts (described below).

Back-in-Range Option

If you are using Automated Monitoring a Back in Range option enables you to specify that a sensor alert cannot be cleared by a check/checklist completion, unless Checkit has received data from the sensor that confirms the equipment it is monitoring has resumed operating within the parameters specified in the relevant sensor rule / setpoint. This option is available to customers using Automated Monitoring but is NOT available and should NOT be used if you are using Automated Monitoring+ ...so an alert may be cleared by a check assigned the Clear Alert action even if the equipment being monitored remains outside of the parameters specified for it - hence care should be taken.

Back-in-Range Takes Time

It may take some time for the equipment for which the alert has been raised, to come back within its normal operating range even after the problem has been identified and fixed. It will often make things clearer if you use the Additional Check Details field, when you specify a check with which you associate the Clear Alert Action, to let the checklist user know they may have to wait a while after fixing the root cause before they can clear the alert/alarm. And you might provide another check enabling them to acknowledge the Alert in which you could advise them to record that the root cause has been corrected, that the alert will be cleared once the equipment reaches its normal operating parameters and assign the Acknowledge Alert Action to that check. The rest of the team will see the acknowledgement and will know that the alert will be cleared in due course.

Broken Sensor Cannot Come Back in Range - Alert Never Clears

On the rare occasions when a sensor is broken and a check has the back-in-range option specified, a checklist user will not be able to clear the alert/alarm via the checklist and therefore also not be able to complete the Checklist (a check with the back-in-range option specified cannot be made optional) and the content will remain on the App/Memo devices on which it was received.

In this situation you can several options as follows.

Clear the alert in the Control Centre

  1. Login to the Control Centre (with an Administrator or Safety Manager login)

  2. Under ALERT STATUS, select Alerts by Location or Team

  3. Select the Alert you want to clear

  4. Select the Force Back in Range option.

Once this has been done, Checkit will accept the completion of the check to which you have assigned the Back in Range option, by the checklist user. Of course the sensor is broken, not back-in-range, which might confuse the checklist user, so we recommend that when you specify a check with the Back-in-Range option you allow for the possibility of this outcome in the wording you use. For example, you might say "confirm that the equipment is now working as required. If Checkit cannot confirm the temperature of the equipment it may not let you complete this check. There may be an issue with the sensor: please contact your supervisor or administrator to clear the alert using the Checkit Control Centre."

A Double-Check Configuration to Ensure Alerts are Cleared

Use two checks in a checklist both with the Clear Alert action selected.

In one of the checks, select the back-in-range option so that the check can clear the alert only if Checkit has data confirming that the device being monitored has resumed operation within the parameters specified. If a checklist user cannot complete the check, the checklist cannot be completed and will remain open so make this check an optional check which can be left uncompleted.

On the other check do not select the back-in-range option so that the alert can be cleared even if the device being monitored has resumed operation within the parameters specified ... but limit completion of this check to selected members of staff using the custom role feature. For example, limit the completion of this check to 'Shop Floor Manager'. If this check were optional, it is possible the checklist could be completed and closed without the alert/alarm being cleared, possibly accidentally, which is not rigorous. Better to leave this check as mandatory (do not select optional) which has the disadvantage that the designated level of staff have to complete this check in order for the checklist to be completed (and the alert/alarm cleared) but carries with it the assurance that at least two people have checked that the alert/alarm has been dealt with properly and should be cleared.

Using this approach means that the responsibility for clearing an alert when a device is not operating correctly is allocated appropriately and that all the work can be completed on the App/Memo without having to login the Control Centre (useful if the staff you want to do this do not use tablets or laptops in their routine workplace).

An alternative variation would be to use the first check for staff, only, with back-in-range specified but in the check text inform the user that if the alert cannot be cleared/the check completed because the device has not come back-in-range, to contact their supervisor/administrator. The supervisor/administrator should be a Checkit Administrator who can use the Force Back in Range option in the Checkit Control Centre. Once the alert has been Forced Back In Range in the Control Centre, checklist users will be able to compete the check and close the checklist and the alert will be cleared.

Alert Actions

The way Alert Actions work differs depending on if you are using them with Automated Monitoring or Automated Monitoring+

Alert Action - for Automated Monitoring Customers

The following Alert Action options are available to you to when specifying the checklist overall and also when specifying individual checks within a checklist:

  • Acknowledge Alert

  • Clear Alert

If you select one of these options for a checklist then as soon as that checklist is completed by a user, the related alert is acknowledged/cleared automatically: reports in the Control Centre and the alert listing in the Alert section of the CWM app/Memo are automatically updated so the whole team knows the latest status. If you select one of the options for a particular check within a Checklist, then as soon as the check is completed by a Checklist user the related alert is cleared/acknowledged.

It does not make sense to select the same option (either Clear or Acknowledge) for both an individual check and the whole checklist - that would result in several acknowledgements / updates. It would make sense, for example, to have the first check in a checklist trigger Acknowledgment of the alert (to let all know that the alert is being addressed) and to have completion of the checklist automatically trigger clearing of the alert (assuming you've designed the checklist in such a way that it is only completed when the problem is resolved).

Checkit enables you to assign roles to checklist users and to limit the completion of selected checks to staff with certain roles. You might consider using a checklist to instruct staff to carry out the necessary remedial work but reserve a check in which you specify the Alert Action Clear, to clear the Alert, to a member of staff with the role manager for example. For details, please refer to Custom Roles (note that this works with Apps/Memos using version 3.0 of the CWM app or higher, only).

Additionally you can enforce the order in which checklist users complete checks within a checklists to ensure they do the required work in a logical/rigorous order - for details refer to Check Sequencing.

Alert Actions - for Automated Monitoring+ Customers

The following Alert Action options are available to Automated Monitoring + customers when specifying the checklist overall and also when specifying individual checks within a checklist:

  • Acknowledge Alert

  • Corrective Action

  • Clear Alert

  • Signed-Off

If you select one of these options for a check/checklist, then as soon as that check/checklist is completed by a user, the related incident is updated in the Checkit website (refer to the Incident Audit page by selecting Incidents from the left menu and selecting the alarm icon for a listed incident).

The Alert Action Acknowledge Alert updates the Cause Identified field in the Incident Audit page, and:

  • Corrective Action updates the Corrective Action Taken field.

  • Clear Alert updates the Incident Resolved field.

  • Signed Off updates the Supervisory Sign-Off field. Note that Checkit enables you to assign roles to checklist users and to limit the completion of selected checks to staff with certain roles. You might consider using a checklist to instruct staff to carry out the necessary remedial work but reserve a check in which you specify the Alert Action Clear, to clear the Alert, to a member of staff with the role Manager for example. For details, please refer to Custom Roles.

When your Checkit account has the Event Driven Actions facility applied, the fields within the Incident Audit page / Incident Audit Report may only be updated automatically via an assigned checklist - you cannot update them directly on the website.

The Audit Report update includes any comments/response entries input by the checklist user for those checks within the checklists that have an Alert Action assigned to them (Acknowledge Alert, Clear Alert etc. ) but not for checks which do not have an Alert Action assigned: however, the Work Report available from the main menu in the Workflow Management Control Centre includes all entries made to each and every Checklist.

It does not make sense to select the same two options for both an individual check and the whole checklist - that would result in several acknowledgements / updates. It would make sense, for example, to have the first check in a checklist trigger Acknowledgment of the alert and to have completion of the checklist automatically trigger clearing of the alert (assuming you've designed the checklist in such a way that it is only completed when the problem is resolved).

Assign a Checklist to an Alert/ Alarm

You assign a checklist to an Alarm / Alert using the Work page in the same way you assign checklists for regular work / checklists, selecting location, team and checklist from the drop-down lists provided . However, when your organisation has the Event Driven Actions facility, an additional option is provided on the Work page enabling you to select the type of alert/alarm a selected checklist should be used to manage.

Location, Location. Be careful to select the specific location of the sensor from which you want alerts to be accompanied by the selected Checklist. If, when you select the Location dropdown in the Work page, the location is not listed you cannot drill down by selecting a higher location: enter the first four letters of the senor's location in the Location field and Checkit will then list matching locations for you to select. (For example, a location Cambridge may have a sub-location 'Kitchen' and you may have to search for 'Kitchen' as the list above lists the 10 most used locations first/only.) Also remember that the mobile Apps / Memos being used by the teams to which you assign these alerts must also be assigned to the location (or one of its sub-locations) to which the alerts relate in order that they receive the alerts (for details refer to Setting up App and/or Setting Up Memos).

You can assign work to any or all types of alert/alarms from a location (but note that you cannot apply more than one item of work to the same types of alert from the same location).

The types of alert for Automated Monitoring are as follows:

  • Sensor Alert (an item of equipment is operating outside of parameters your organisation has specified in a sensor rule - refer to Configure sensor rules for more details)

  • Low Battery (a service alert - refer to How to replace Sensor+ batteries for more details)

  • Sensor Miscom (a service alert for an issue with communications between sensor and Checkit hub)

  • Repeater Miscom (a service alert for an issue with communications between sensor+ and Checkit hub)

  • Hub Miscom (a service alert for an issue with a hub which would affect communications with all sensors transmitting data to the Checkit hub).

The types of alarm for Automated Monitoring+ are as follows:

  • Sensor Alarm

  • Sensor Alert

  • Site Comms Alert

  • Sensor Hardware Issue

  • Warp Hardware Issue

  • Repeater Hardware Issue

  • Energy Alert

  • System Hardware Issue

  • Unknown Alarm

Different Checklists for Different Equipment

When you assign a checklist to alerts using the Work page, you can assign work to any or all types of alert/alarm from a location. When an alert/alarm is raised it tells you which location and which particular sensor/device in that location, the alert relates to.

If you have several sensors in the same location (all are "Cambridge Kitchen" for example) but you want to assign different checklists depending on the equipment being used (a food Freezer for example may require food to be disposed of while this is less likely with a Fridge used for drinks only) you have several options, as follows:

change your sensors locations so that each has a unique location name (as well as a unique
name). "Cambridge Kitchen Freezer" for example and "Cambridge Kitchen Wet Fridge", for example. When you assign a checklist using the Work page you select the appropriate location for the selected checklist. If you are using Automated Monitoring you can use the Control Centre to change the designated location of a sensor do this - for details refer to Change the Location of a Sensor/ Repeater. If you are using Automated Monitoring+ please contact Checkit.

create three checklists as follows:

  • one assigned to the sensor and service alerts for the location and team. It contains only 1 check prompting the user to select which of the items of equipment has the fault and instructing them to open and use the appropriate checklist which they can find under Unscheduled checklists from the App/Memo home page. That check could contain an Acknowledge Alert Action which will update the rest of the team so they know the alert is being addressed

  • two other checklists (or any number depending on how many unique checklists you need/unique types of equipment you use) each with the actions appropriate to the different equipment. They should be unscheduled so they are available at any time under the Unscheduled checklists option on the Home page of the App/Memo for the user to select and use. They specify the tasks to be carried out to resolve the issue and would have a final check instructing the checklist user to clear the alert in the Checkit Control Centre. (Select ALERT STATUS, select the alert you want to clear and use on the options on the page to comment on and clear the alert). (You cannot use the Alert Actions in a checklist that is not directly assigned to an alert type / triggered by an alert - the checklist would not know which alert it should clear.)

Unscheduled checklists can be found from the home page of the App/Memo by selecting this icon

image-20240115-160215.png

Reporting Alerts and Alarms

Alerts/alarms are reported in the Automated Monitoring+ website (refer to Reporting) and the Workflow Management Control Centre (refer to How to Manage and Clear Alerts) in the same way as they are when you are not using Event Driven Actions (EDA).

When you are using EDA, complete and incomplete checklists are reported in the Reports section of the Control Centre (the Connected Workflow Management web portal). Select Reports > Work > View, then select the location you are interested in and then the dates for which you would like to see data.

Automated Monitoring+ customers will also see that the Incident Audit page and associated report in the Checkit website are also updated as described under Alert Actions above (and shown below). Note that where the user completing the checklist on the App/Memo does not have a login account on the CAM+ website, the entry in the By field will be "Checkit user".

image-20240115-160311.png

Note The Audit Report update includes any comments/response entries input by the checklist user for those checks within the checklists that have an Alert Action assigned to them (Acknowledge Alert, Clear Alert etc. ) but not for checks which do not have an Alert Action assigned: however, the Work Report available from the main menu in the Workflow Management Control Centre includes all entries made to the Checklist.

Graphs showing the movement of temperature over time can be very useful when trying to resolve an alert/alarm from temperature related sensors: you can check what temperature was reached as a result of the fault and for how long in order to decide if the content must be wasted or are still good to use, for example. If you are using Automated Monitoring+ select All Sensors on the top page of the website and then the graph icon for the senor you are interested in. if you are using Automated Monitoring select Automated Monitoring Status/View from the main menu in the Control Centre and then select the sensor you want. (You could put the web address for these pages into a checklist question to make it a little easier for someone working on the CWM app to look up. For example "check on https://v4.tutelasystems.com/ to find out if the device was out of range for more than 20 mins (select the graph icon)". (This will not work on the Checkit Memo which is not open to web browsing but is available on the App.)

If you are using our Operational Insights service, data about the alerts/alarms your Checkit installation has generated and how they have been resolved are included in the analysis provided.

Clearing Alarms and Alerts

You can acknowledge and clear alerts using either the Control Centre or the CWM app.

If you acknowledge an alert using either the Control Centre or the app, it will be recorded in both.

If you clear an alert using either the Control Centre or the app, it will be removed from both.

If you clear all alerts using the Control Centre, all alerts will be removed from the Control Centre and the app.

If you have already started an alert checklist on the app, the alert will remain on your device until you have completed the checklist, regardless of whether the alert has been cleared from the Control Centre.

Example Uses of Mobile Alerting

Simple Scenario

The main fire door at the rear of a small office has a Checkit sensor applied to it to ensure that staff are alerted if it is left open. An alert is raised if the fire door is open outside of specified times (fire drill routine / office hours) and sent to the CWM app on the mobile phones of the office manager and the security company that oversee the building. With the alert a short checklist instructs the team members what to do (including if it can't be closed / is broken / the event happens in the middle of the night) and when anyone updates the checks in the checklist, the others can see the progress. The first check in the checklist asks the user to confirm they are looking at the issue and its completion automatically acknowledge the alert so that there is a record and other team members can see it is being worked on and by whom. Once the checklist is complete, the Alert is automatically cleared, and all relevant reports updated accordingly.

Multiple Sensors and Multiple Teams Scenario

A Bar & Grill has several fridges and freezers containing food and drinks in both the bar and the kitchen. To avoid loss of food or only being able to offer warm drinks on hot summer days, it is important that action is taken promptly should any of the fridges or freezers fail.

Each sensor is set to its own unique sub-location ('1 Bar Food Fridge', '2 Bar Ice Box', '11 Kitchen Diary & Desert Fridge', '12 Kitchen Fish Freezer' ' etc.). Sensor locations are specified when sensors are installed/setup but can be changed subsequently.

2 rules are created in Checkit Control Centre - one for fridges, one for freezers - specifying the temperature ranges each type of equipment should operate within. Checkit raises an alert if a device to which the rule is applied moves out of the range specified in the rule. If you are using Automated Monitoring refer to Configure for details about rules. If you are using Automated Monitoring+, refer to Changing Alarm Set Points.

If you are using Automated Monitoring, a monitoring task created in the Checkit Control Centre assigns the appropriate rule to each sensor: refer to Configure for details. If you are using Automated Monitoring+, Checkit may have setup monitoring tasks for you and you can change them - refer to Changing Alarm Set Points.

Using the Event Driven Actions facility an item of Work, created in the Checkit Control Centre, specifies the Checkit checklist that should accompany an alert by location, team and type of alert.

(If you do not have the Event Driven Actions facility, you would receive alerts in the usual way but they would not be accompanied with a checklist with instructions about how to proceed).

The checklists instruct staff what to do when they receive an alert. In this case 2 different checklists are used so that slightly different instructions could be given for fridges and freezers.

Four items of work are assigned in the Control Centre: two for the Bar Staff team, two for the Kitchen team. One of the items of work for each team specifies the location as the Freezer (Bar Freezer or Restaurant Freezer) and the other the Fridge (Bar Fridge or Restaurant Fridge) and assigns the appropriate checklist.

(If the bar equipment was all in one location ('Bar' for example) and each device differentiated by name only, only one item of work could be assigned, so one checklist only, so in that case, one checklist would have to cater for both fridge and freezer scenario (optional checks could be used so that some checks could be ignored by the person completing the checklist as not applicable).

Example Checklist Definition

image-20240115-160453.png

In the above example the Clear Alert Check has the Back in Range option selected: this means the check cannot be completed until Checkit receives data from the sensor indicating that the equipment involved is once again working within its normal range (as specified in the rule that initiated the alert/alarm).

Example Check Definition with Alert Action

image-20240115-160521.png

JavaScript errors detected

Please note, these errors can depend on your browser setup.

If this problem persists, please contact our support.