
You can create new contacts and update existing contact details in CAM+ by importing a CSV or XLSX file, instead of managing each contact individually on the CAM+ Website.
When you upload a file, CAM+ uses the contact name to determine whether to create a new contact or update an existing contact:
-
If the contact name does not already exist in CAM+, a new contact is created.
-
If the contact name already exists but other details have changed, the existing contact is updated.
-
If the contact name and all other details are unchanged, the contact is skipped.
-
If a contact contains an error, that contact is not imported. Other valid contacts in the file are still created or updated.
Preparing Your File
You can use the CSV or XLSX template provided below, as applicable:
If you choose to create your own file, it must include a CONTACT_NAME column and, for each contact, at least one PHONE, EMAIL, or SMS value.
Contact names must be unique.
If you need to create contacts with the same name, give each contact a distinguishable name, for example, Jon Smith (Day) and Jon Smith (Night)
You must not change a contact’s name in the import file.
If you change a contact's name in the import file, CAM+ will treat it as a new contact rather than renaming the existing contact. To rename an existing contact, modify the contact directly in CAM+.
Important: Avoid overwriting recent changes
Importing a spreadsheet updates existing contact records with the information contained in the spreadsheet. If you import an older version, it may overwrite more recent changes made by someone else.
If multiple people in your organisation manage contacts, we recommend maintaining a single shared master spreadsheet using a cloud storage service such as Microsoft OneDrive, SharePoint or Google Sheets.
This ensures everyone works from the same, up-to-date information and helps prevent changes from being overwritten by outdated spreadsheets.
You cannot delete a contact from the CAM+ Website by removing it from your import file.
If you delete a contact from the import file, the contact will remain in CAM+. To delete it, you must delete the contact directly in CAM+.
If SWITCHBOARD is set to TRUE for a contact, you must also provide an EXTENSION.
Import Contacts
You must have the Manage Contacts permission to import contacts.
-
Log in to the CAM+ Website.
-
Click the contacts icon on the relevant site.
-
Click Manage Alarm Contacts.
-
Click Manage Contact Names.
-
Click Import.
-
Click +Choose File.
-
Select the CSV or XLSX file from your file explorer.
-
Upload the file. You will receive an email when processing is complete. You do not need to remain on the page while your file is being processed.
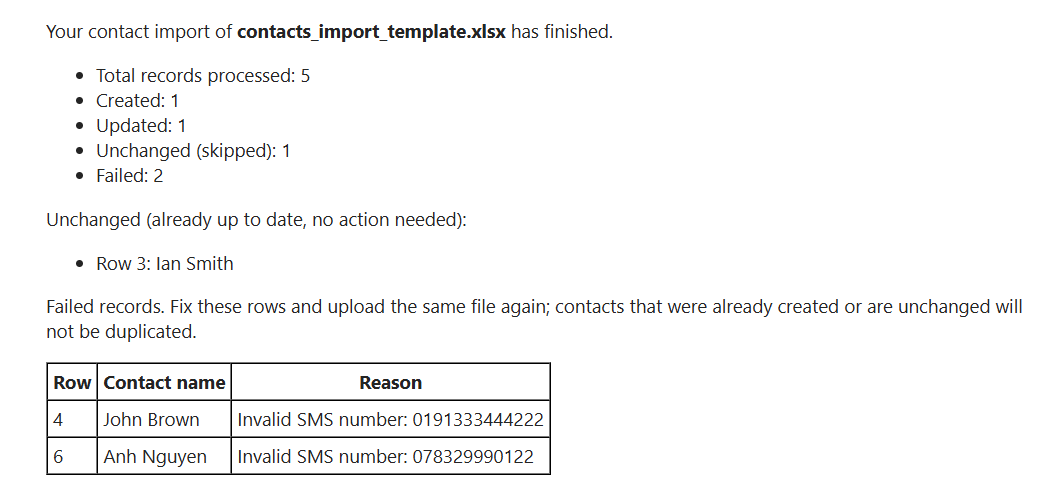
When processing is complete, CAM+ will email you a summary (see image 1) showing the number of contacts that were:
-
Created
-
Updated
-
Unchanged/skipped
-
Failed
It includes details of users that were not changed and those that failed.
Imported contacts will not automatically receive alarm notifications. To receive alarm notifications, you must allocate the contact to a contact list.
View Full Details of Contacts Import
The import summary email provides an overview of the results. To view the full details of your contact imports, including individual changes, you can use the User Audit Report on the CAM+ Website.
The information available depends on your user role:
-
Standard User – Can only view changes they have made.
-
Customer Admin – Can view changes made by all users.
-
Log in to the CAM+ Website.
-
Click the Audit Users icon on the relevant site.
-
In the Sort dropdown menu, select Contact Management Audits.
-
Click View Details on an audit to see all full details of the import.
-
(Optional) Filter by type:
-
Created
-
Updated
-
Unchanged
-
Failed
-